About
I received a Canon LiDE 30 USB scanner as a birthday present this year, at my party. That was on 2004-01-17. A rather nice and unexpected present, I must say... and a welcome one. Here are my experiences with it.Update (2005-03-01): The scanner is still working great! It's small enough to take with me in my backpack, which has been handy a few times. It has scanned lots of documents in the past year, but still works well and provides good-quality images.
Update (2017-04-13): Still going, 13 years later. This thing has never once given me any problems, and these days it "just works" by default in Linux with xsane. The only configuration I ever need to to is maybe hitting the auto-calibrate button once in a while.
First Impressions
The first thing I did after opening the box was go to google and look up linux "lide 30". I didn't seriously expect it to work in linux. But I quickly found a message from someone claiming it worked with SANE. So I told apt-get to grab the latest versions of sane and xsane, and plugged in the scanner.I tried running "sane-find-scanner" and it found one. So far, so good. I tried running xsane, and it told me there were no scanners available. On a hunch, I ran xsane as root. This time, it found the scanner. (note to self: set up proper permissions for the scanner sometime)
So, I stuck something under the scanner lid, hit "acquire preview", and saw what I had hoped for. Then I hit "Scan" and got a nice (but dark) picture. Yay! I now have a scanner which works in linux, is small, light, portable, and can be (un)plugged without rebooting. I'm using SANE 1.0.13, BTW.
Details
Over the next few days, I played with the scanner quite a bit. Here is what I found:Pictures come out well with a gamma setting of 2.10, brightness of 4.0, and contrast of 3.0.
This scanner can do 1200x2400dpi optical! That's twice the resolution of my old scsi scanner, in a package half as big and one quarter as heavy. As a bonus, this thing costs half as much, produces better images at the same resolution, and can be (un)plugged without rebooting.
I've noticed that the scanner clicks and sometimes skips a few scanlines if I overload my cpu/disk use too much during scanning. Otherwise, the device works very well. It's worth mentioning that the three buttons on the front don't do anything in linux, but that's okay because I don't want them to.
Descreening
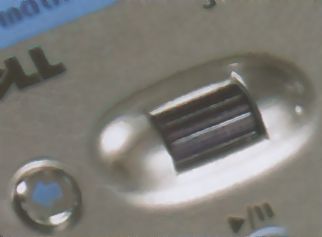
No descreen filter is included in sane, xsane, gimp, or anything else available for linux. This means scanning half-toned images (from magazines, newspapers, etc) is much harder. However, I've been experimenting, and have come up with a few manual descreening methods which seem to work sometimes. Here are some example pictures from a scan from a dell catalog:
The original image, scanned at 600dpi:
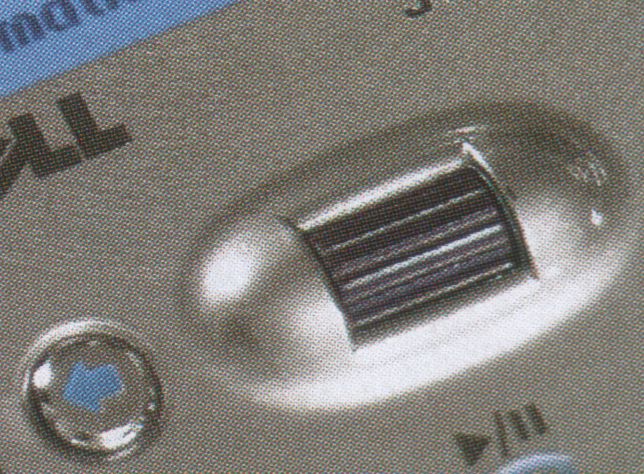
Notice the circular dot patterns. This is how half-toned images normally
look, and it is the effect we're trying to get rid of.
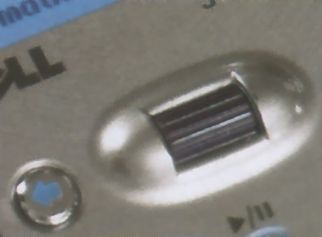
Scaled down (worst quality) by half (what the scanner might see at 300dpi):
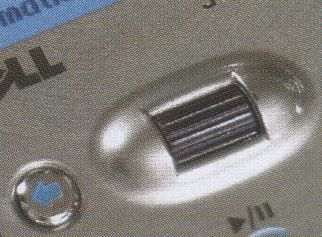
Yuck. Sharp, but extremely noisy.
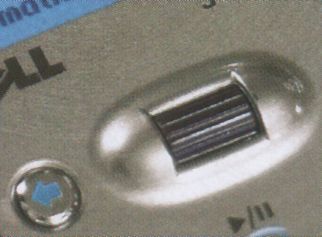
Scaled down (bicubic) by half:
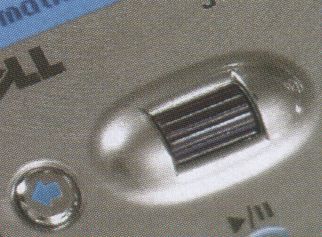
A little better, but not much. At least this method isn't as phone to Moire effects.
My long descreen method, variant 1:
Details:
    - duplicate layer
    - gaussian blur bottom layer, radius 13
    - gaussian blur top layer radius 5
    - add layer mask to top layer
    - copy bottom layer into top layer mask
    - edge detect layer mask, amount 2.0
    - gaussian blur (rad 4) the layer mask
    - adjust layer mask curves, increasing its lower gamma somewhat
    - flatten image
    - scale 50%
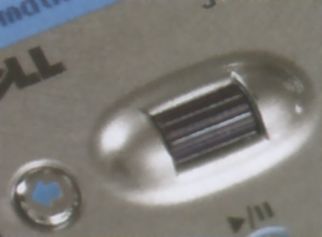
The smooth areas are pretty smooth, and the details are mostly sharp. But some detail is lost.
My long descreen method, variant 2:
What's different is that the top layer had a despeckle (recursive, nonadaptive, radius 2) applied instead of a gaussian blur:
The edges are sharper than before, and smoother. But even more detail is lost, and it looks a bit like it had the "oil painting" effect applied.
My long descreen method, variant 3:
What's different is that the top layer had a despeckle (nonrecursive, nonadaptive, radius 2) applied instead of a gaussian blur:
This one looks best out of the ones using my long method, I think.
Simple despeckle-then-scale method (adaptive, recursive, radius 3):
The colors are off here, due to despeckle. Also, the smooth parts of the image aren't very smooth. But it's nice and sharp, and looks better than if I had merely scaled it.
So, which method is best? I don't know. It depends on your image, probably. Some of these seem to work very well on some images but badly on others. I normally use the despeckle-then-scale method, but in this case it doesn't look very good.
In any case, scanning halftoned images will probably require you to scan at a high resolution then process and shrink the image. I'd suggest 600dpi for this, as it seems sufficient for most printed material. If you scale this sort of scan down to 150dpi, it should look very nice. The methods I tried above are targeted at only 50% reduction, though, which is a bit more difficult.